In this tutorial, we will look into how to upload files to SharePoint using Java language. There are a couple of ways to upload files to SharePoint using Java. One can use Microsoft Graph API or Microsoft Graph SDK.
I am going to use the Microsoft Graph SDK for uploading a file.
There are some prerequisites, you need
- Java 8 or higher
- Maven version 3.6 or higher
- Microsoft account
After you’ve set up the above prerequisites, let’s see upload files to SharePoint using Java.
When it’s come to uploading a file to SharePoint programmatically, there is no straightforward way. There are some prior steps you have to follow.
Table of Contents
First of all, what is Microsoft Graph, anyway?
Well, it provides a collection of Microsoft 365, windows 10, and enterprise mobility data. It’s the new way of accessing many of the Microsoft data through a unified model. You can use the Microsoft Graph to build apps for your organizations and for the consumers that connect millions of users. Read more about Microsoft Graph here.
The following things are we are going to do.
- Create an app in the Azure portal for API access.
- Choosing an authentication provider for accessing graph APIs.
- Using the auth provider, we’re going to develop a Java graph client.
- Then we can call methods for uploading a file or multiple files.
How to create Azure Active Directory App in Azure Portal
Make sure to follow every step, which I’m about to show you. You will create a new Azure active directory app (AD) using the Azure Active Directory admin panel.
- Open a browser and navigate to the Azure HomePage and log in using a personal account or work account. (organization account)
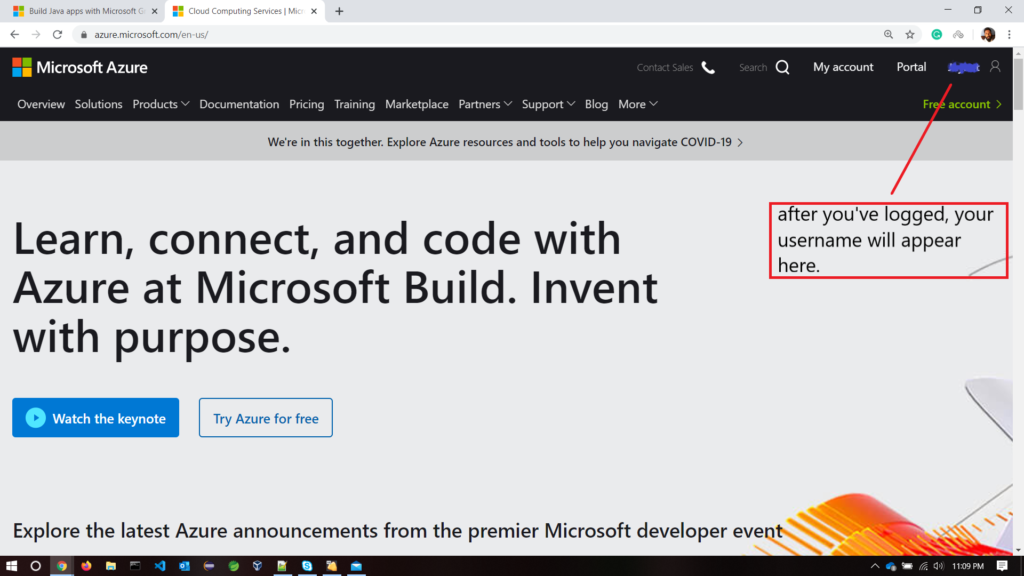
- Then select the portal tab, and you will redirect to the Azure portal.

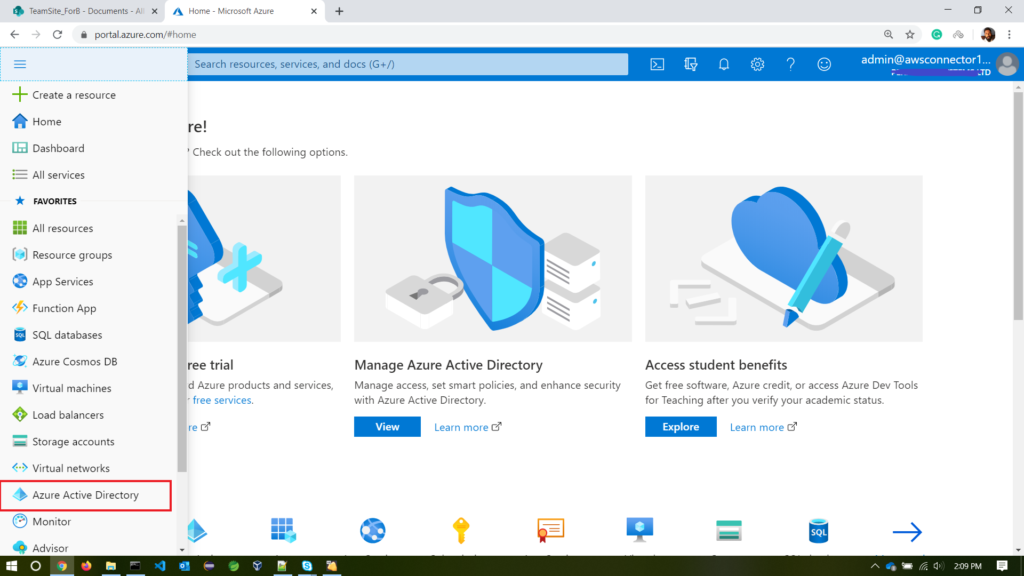
- In the portal, select Azure Active Directory.
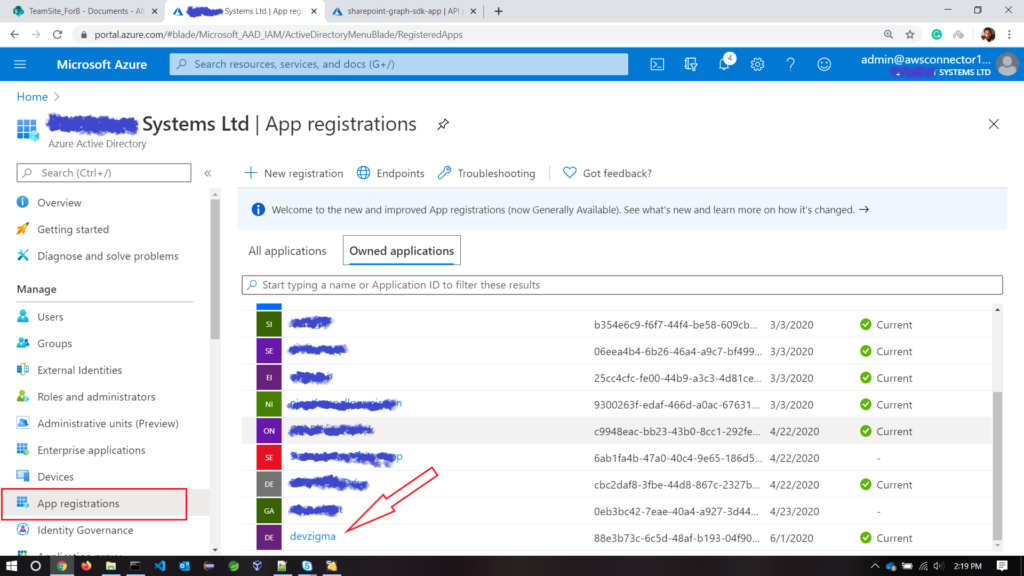
- Select App registration on the manage section.
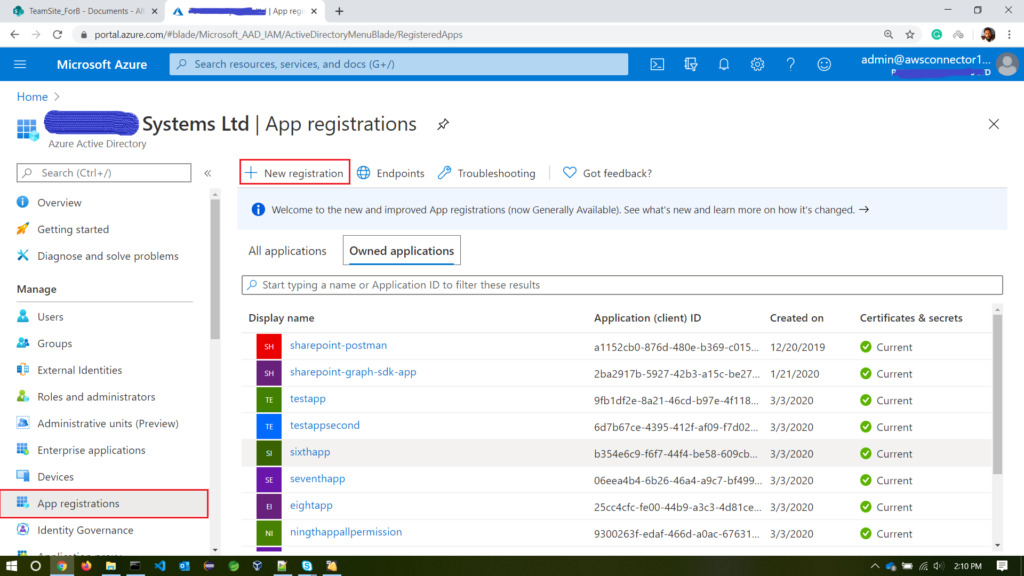
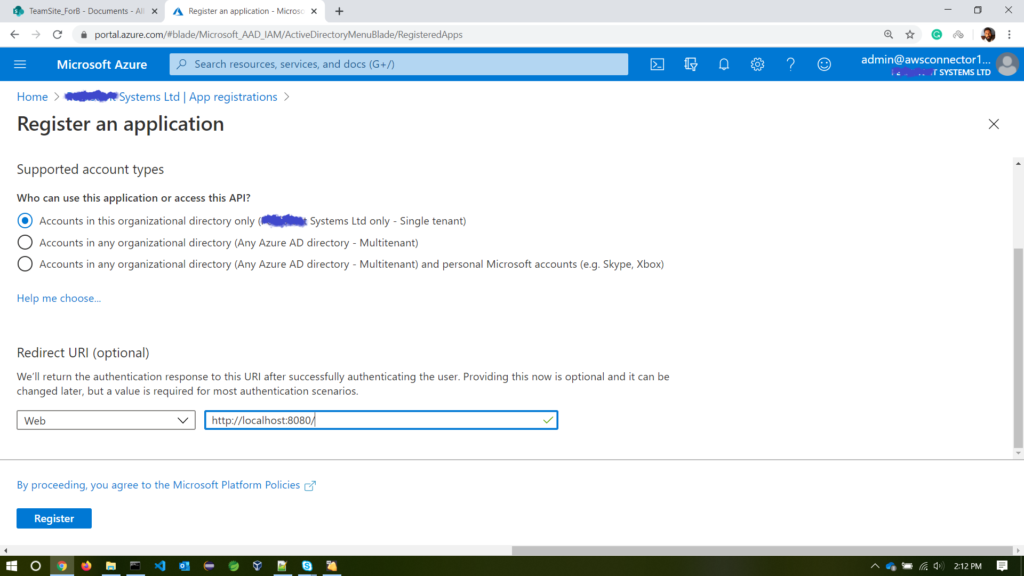
- Now, you will be able to create a new app. Click on New registration, and you will prompt to provide the details for your app.
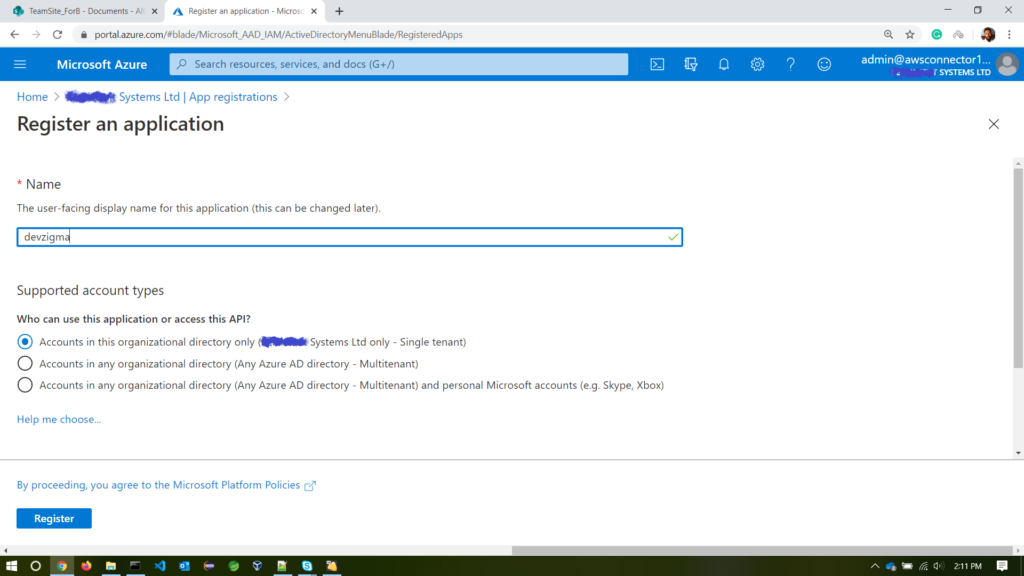
- Set Name to anything you want, but I’ll choose as devzigma.
- Set supported account type to any choice you wish to, in this case, I’ll accept as Accounts in this organizational directory only (***** Systems Ltd only – Single-tenant)
- Under Redirect URI, change the dropdown to Web, and set the value to
http://localhost:8080/ - Hit on register
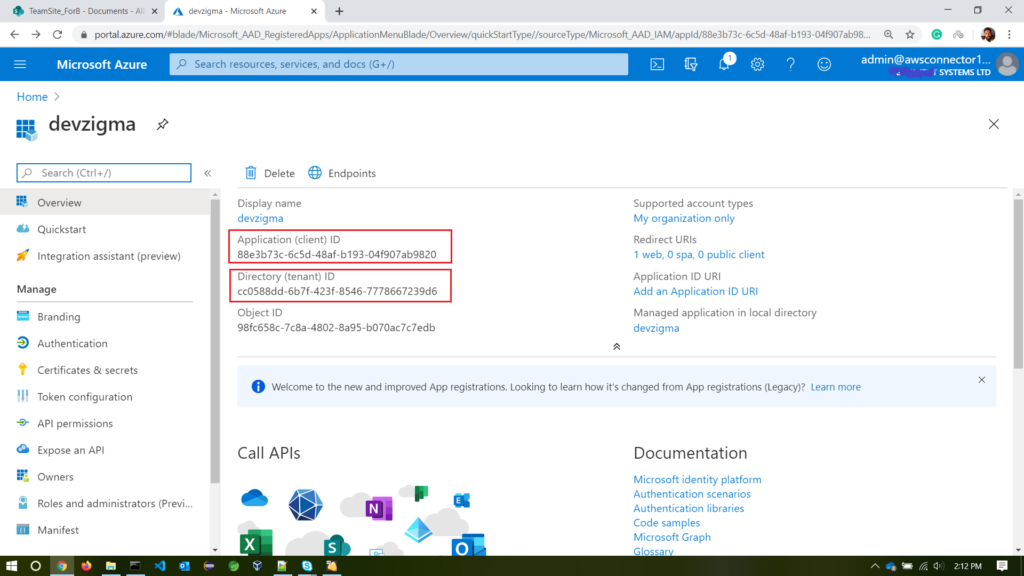
- Copy the value of the application (client) id and directory (tenant) id. Save it. You will need it when creating our java application.
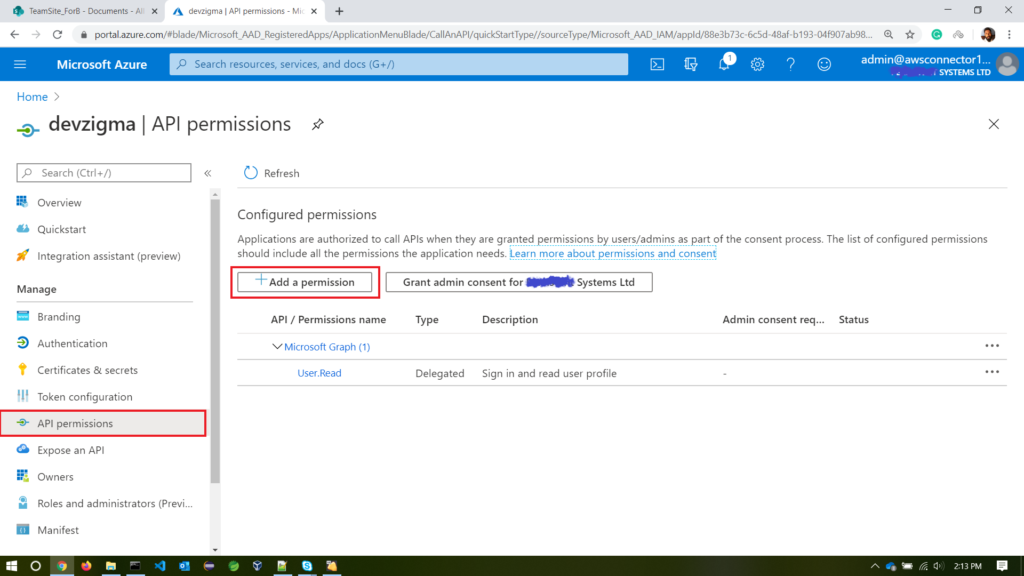
- Now we need to provide APIs permission for our created app. So that when we’re creating our Java application, we can call APIs to access Microsoft product APIs. Select API permission in the manage tab on the left side. Then click on add permission.
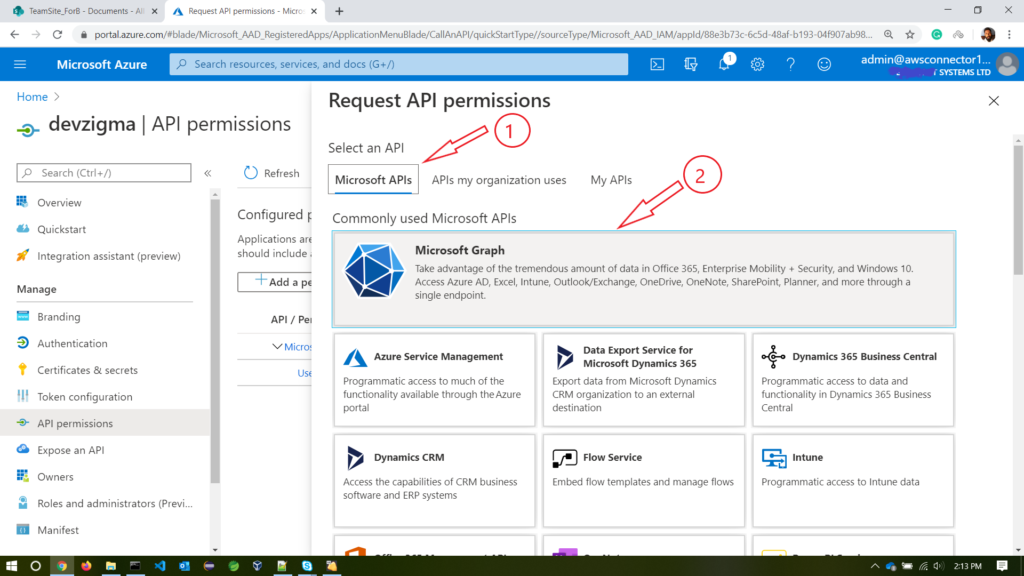
- Under Microsoft APIs, select Microsoft Graph.
- We will give our app
delegated permissionsso that we can access the APIs as a signed-in user.
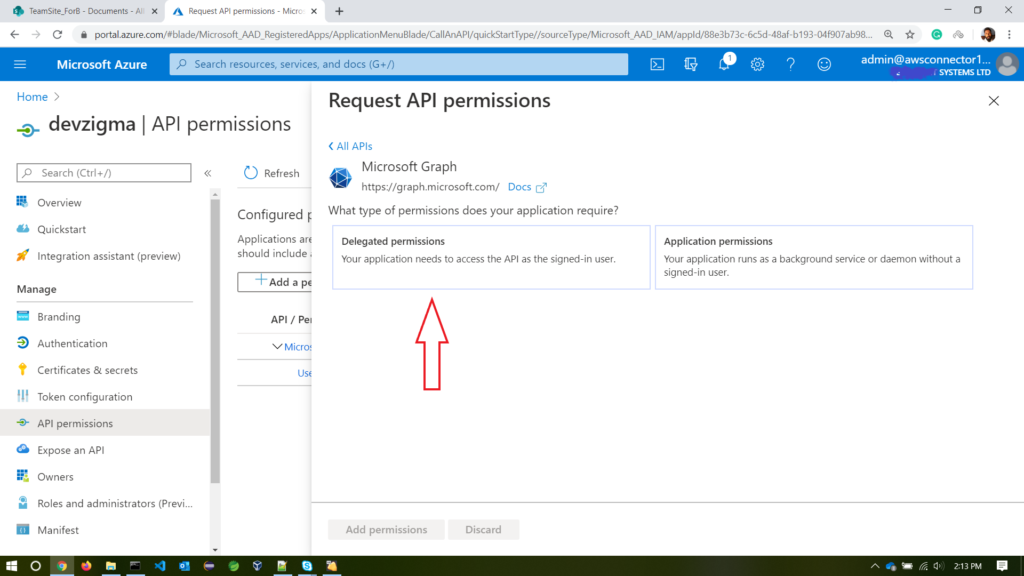
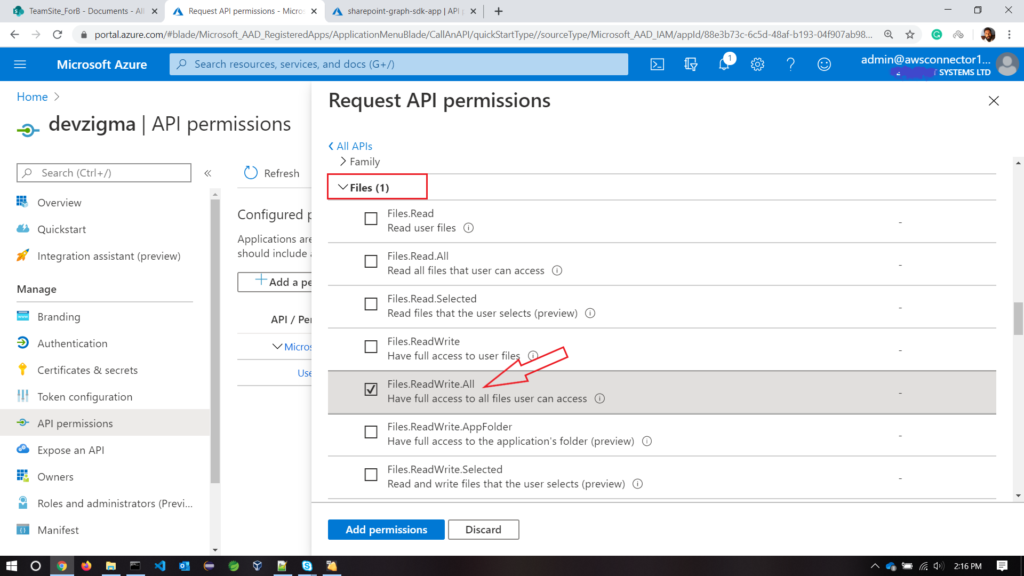
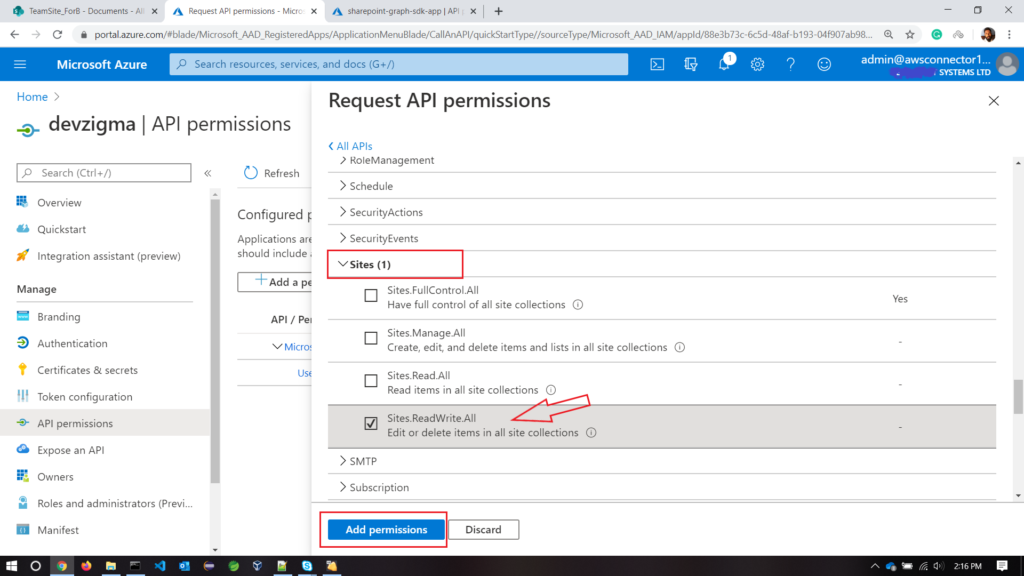
- Now we need to add the following permissions.
- Select
file.readwrite.allunder Files - Select
sites.ReadWrite.allunder Sites - Click on add permission
Types of API permissions
There are two types of API permissions
- Application permissions – Your client application needs to access the web API directly without the user context.
- Delegated permissions – Your client application needs to access the web API as the signed-in user, but with access limited by the selected permission.
Read more about permissions from here.
- Make sure to click on the Grant admin consent button as well.
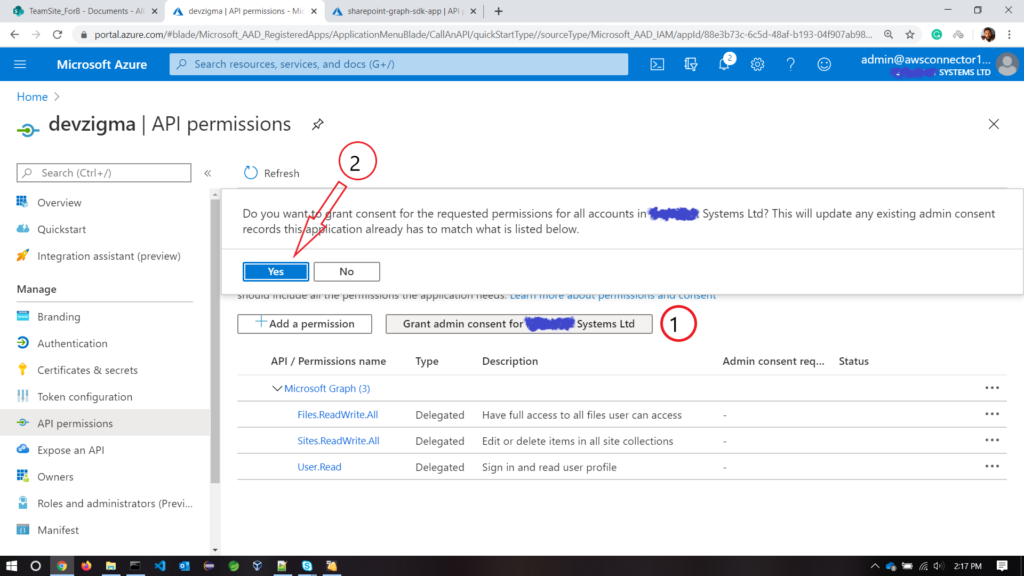
- Now we need to create a
client secretfor our created app. For that, select the Certificate and secrets on the left side Manage panel. Click on the new client secret, give it a name and expiry time. Then hit on the add button.
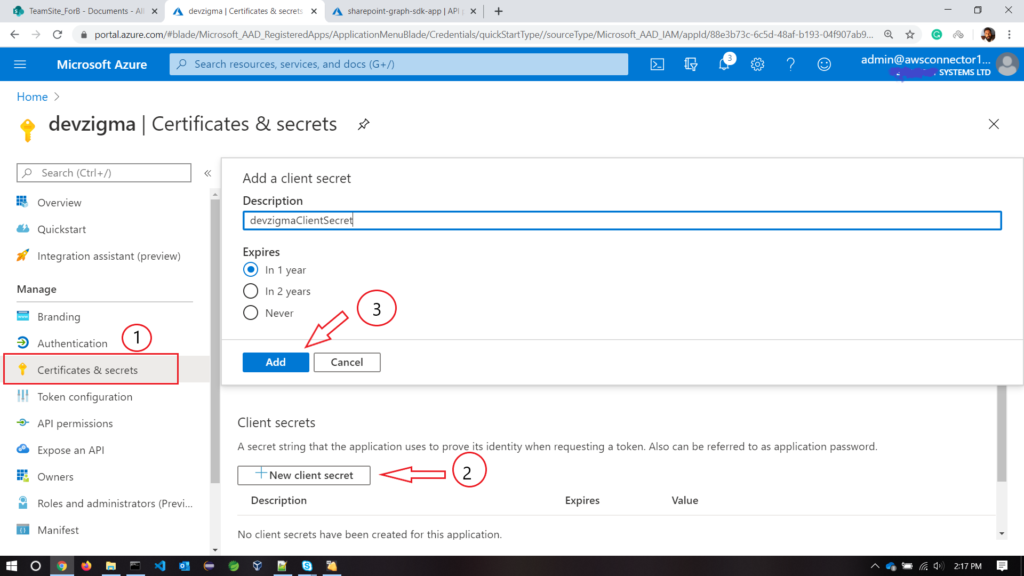
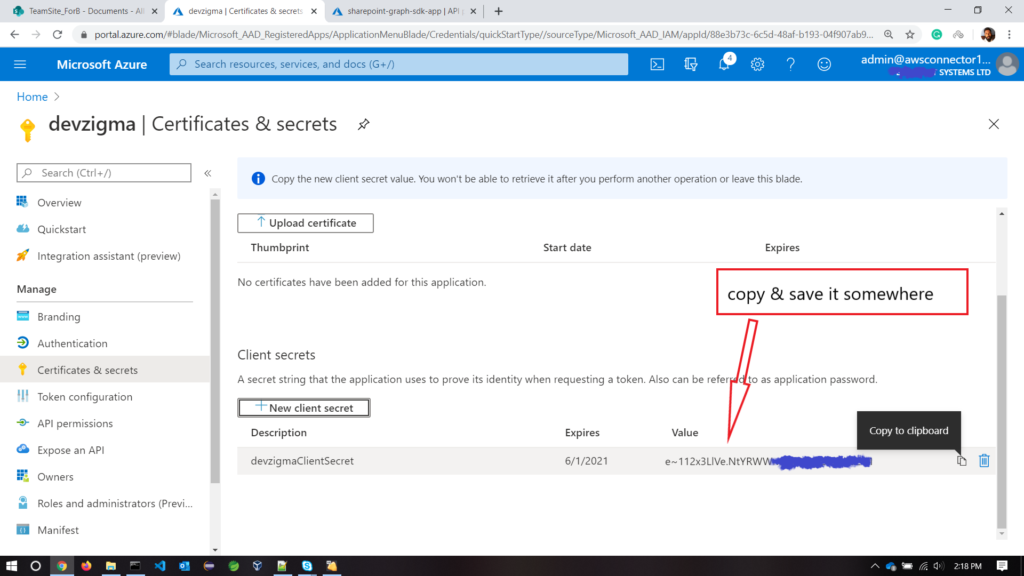
- After creating a client secret, make sure to keep its value because you will need it.
Congratulations! You made it. Now, if you want to see your created app/s, go to the app registrations option in the manage section. In there, you can see your all created apps. Whenever you want specific details about your app, choose one.
All right, now let’s move into the coding part.
Upload files to SharePoint using Java
Following things, we are going to do.
- let’s create an authentication provider for accessing graph APIs.
- Using the auth provider, we’re going to develop a Java graph client.
- Then we can call methods for uploading a file or multiple files.
Create a maven project
I’m using Intellij Idea as my IDE. You can download community edition from their official web sites. So create a maven project. If someone doesn’t know what a maven is, It’s an automation and management tool for Java. It makes our life easier when developing Java applications.
We can quickly build our Java project as a WAR or JAR so that we can deploy it quickly. Also, when managing dependencies, it is straightforward to add dependencies to your maven pom.xml file.
Project Structure
I have given my package name as com.devzigma. You can give any name you want. Make sure to segregate your Java classes into appropriate packages.
The following packages will use in our application.
- com.devzigma.auth
- com.devzigma.config
- com.devzigma.upload
That is all you need. Below is my project structure.
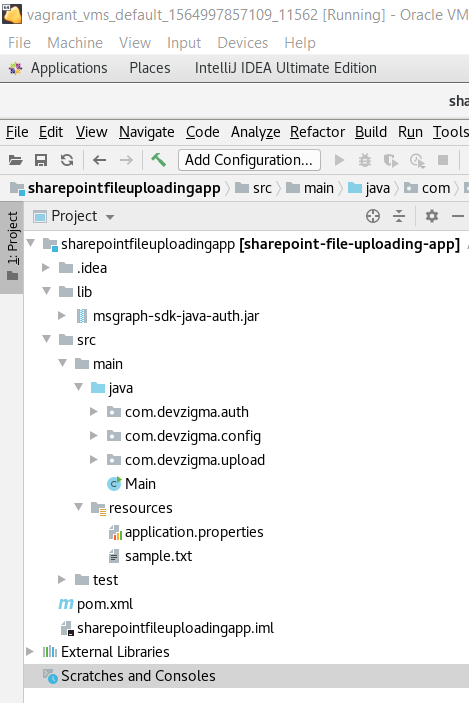
All right after the project is set up, Let’s move on to the project dependencies.
Required Dependencies
We need two dependencies – one for authentication and another for calling graph APIs.
You can download the Graph API dependency here. add below jar to the pom.xml file.
<dependency>
    <groupId>com.microsoft.graph</groupId>
    <artifactId>microsoft-graph</artifactId>
    <version>1.7.1</version>
</dependency>
Calling Graph APIs, we need some authentication mechanism. For that, I will use Microsoft Graph Auth SDK. you can download it here.
Since it is a Gradle project, I have cloned the project into my Linux machine and build it so that I can get the jar file. Before building your Gradle project, you need to install it in your machine. You can get installation details from Gradle official website.
Use below command to build the jar, in either Windows command line or Linux/ Mac terminal.
gradle build -x testIn the project structure, there is a folder called lib. If you want to use dependency that is not in maven repo, then you can place those jars in the lib folder. You need to specify the path of the jar file to use like below.
<dependency>
    <groupId>com.microsoft.graph</groupId>
    <artifactId>microsoft-graph-auth</artifactId>
    <version>0.1.0</version>
    <scope>system</scope>
    <systemPath>/data/code/ResearchProjects/sharepointfileuploadingapp/lib/msgraph-sdk-java-auth.jar</systemPath>
</dependency>
Here you can mention anything for groupId, artifactId, and version. For the systemPath, you need to provide the path for the jar file.
Now our dependencies are all set. Here is the full pox.xml file
<?xml version="1.0" encoding="UTF-8"?>
<project xmlns="http://maven.apache.org/POM/4.0.0"
         xmlns:xsi="http://www.w3.org/2001/XMLSchema-instance"
         xsi:schemaLocation="http://maven.apache.org/POM/4.0.0 http://maven.apache.org/xsd/maven-4.0.0.xsd">
    <modelVersion>4.0.0</modelVersion>

    <groupId>com.devzigma</groupId>
    <artifactId>sharepoint-file-uploading-app</artifactId>
    <version>1.0-SNAPSHOT</version>

    <properties>
        <maven.compiler.source>1.8</maven.compiler.source>
        <maven.compiler.target>1.8</maven.compiler.target>
    </properties>

    <dependencies>

        <dependency>
            <groupId>com.microsoft.graph</groupId>
            <artifactId>microsoft-graph</artifactId>
            <version>1.7.1</version>
        </dependency>
        <!-- below depedency needed for username/password authentication provider -->
        <dependency>
            <groupId>org.apache.oltu.oauth2</groupId>
            <artifactId>org.apache.oltu.oauth2.client</artifactId>
            <version>1.0.2</version>
        </dependency>

        <dependency>
            <groupId>com.microsoft.graph</groupId>
            <artifactId>microsoft-graph-auth</artifactId>
            <version>0.1.0</version>
            <scope>system</scope>
            <systemPath>/data/code/ResearchProjects/sharepointfileuploadingapp/lib/msgraph-sdk-java-auth.jar</systemPath>
        </dependency>

    </dependencies>

</project>
Externalize configuration parameters using the application.properties file
It is a good practice to configure parameters in our web application to a commonplace. So that those parameters can have different values for different runtime environments, in that case, I have externalized my graph API app parameters to the application.properties file. So I can access them or change them very quickly
Now, If you haven’t already created a resources folder under src/main, create one and inside that create application.properties file. In that file, we provide data as a key-value pair. So we can access the value using a key. Remember, I told you earlier in the article that save some of the values when we were creating an app in Azure Active directory.
Now let’s put those values into our application.properties file.
client.id=2ba2456b-5877-42b3-a15c-be27d98798b2
client.secret=BMLz8TNsbVVl1sdwgIUY7GUO3Yu@z:.:
tenant.id=cc1522dd-6b7f-653f-8546-2228663419d6
user.password=your password
user.name=your microsoft account username
scope=https://graph.microsoft.com/.defaultclient.id, client.secret, and tenant.id are the values for our created azure app. It will be different for your app. user.name and user.password are the credentials used to login for your azure account or Microsoft account.
A scope defines the set of permissions request by the azure application. The scope is either static or dynamic. In this case, I’m going to choose a static scope using .default. I can request the statically configured list of permissions.
If you want to know more about permissions, refer to this.
Creating a Java class to read the application.properties values
Now let’s see how to read our application.properties values using Java class. Earlier, we’ve created a package called com.devzigma.config. In there, create a class called ApplicationProperties.
I’m going to create methods for reading each value in the properties file so that I can reuse those values anywhere in my Java application.
package com.devzigma.config;

import java.io.FileNotFoundException;
import java.io.IOException;
import java.io.InputStream;
import java.util.Arrays;
import java.util.List;
import java.util.Properties;

public class ApplicationProperties {

    private InputStream inputStream;
    private Properties properties;

    public Properties getPropValues() throws IOException {
        try {
            properties = new Properties();
            String propFileName = "application.properties";

            inputStream = getClass().getClassLoader().getResourceAsStream(propFileName);

            if(inputStream != null) {
                properties.load(inputStream);
            } else {
                throw new FileNotFoundException("property file: " + propFileName + " not found in the classpath.");
            }
        } catch (IOException e) {
            System.out.println("io exception: " + e);
            throw new IOException("error");
        } finally {
            inputStream.close();
        }
        return properties;
    }

    public static String getClientId() throws IOException{
        try {
            Properties propValues = new ApplicationProperties().getPropValues();
            String clientId = propValues.getProperty("client.id");
            return clientId;
        } catch (IOException ex) {
            throw new IOException("client id not found");
        }
    }

    public static String getClientSecret() throws IOException {
        try {
            Properties propValues = new ApplicationProperties().getPropValues();
            String clientSecret = propValues.getProperty("client.secret");
            return clientSecret;
        } catch (IOException ex) {
            throw new IOException("client secret value not found");
        }
    }

    public static String getTenantId() throws IOException {
        try {
            Properties propValues = new ApplicationProperties().getPropValues();
            String tenantId = propValues.getProperty("tenant.id");
            return tenantId;
        } catch (IOException ex) {
            throw new IOException("tenant id value not found");
        }
    }


    public static List<String> getScopeList() throws IOException {
        try {
            Properties propValues = new ApplicationProperties().getPropValues();
            String[] scopeList = propValues.getProperty("scope").split(",");
            return Arrays.asList(scopeList);
        } catch (IOException ex) {
            throw new IOException("scopes value not found");
        }
    }

    public static String getUsername() throws IOException {
        try {
            Properties propValues = new ApplicationProperties().getPropValues();
            String userName = propValues.getProperty("user.name");
            return userName;
        } catch (IOException ex) {
            throw new IOException("user name value not found");
        }
    }

    public static String getPassword() throws IOException {
        try {
            Properties propValues = new ApplicationProperties().getPropValues();
            String userName = propValues.getProperty("user.password");
            return userName;
        } catch (IOException ex) {
            throw new IOException("user name value not found");
        }
    }
}
In the above code, you might be wondering why I make the return type as List<String> in the getScopeList() method. Because List<String> is the type that our auth provider expects.
Choosing an Authentication provider for accessing Microsoft Graph APIs
let’s create a Java class in com.devzigma.auth package and call it AuthenticationProvider.
Authentication providers implement the code needed to acquire an access token using the Microsoft Authentication Library (MSAL). It handles many numbers of error and set the HTTP request authorization header for us.
There are a set of auth providers for different types of application types. You can read more information from here.
I’ ll be using a username/password auth provider for our application. It allows our app to sign in by providing username and password.
package com.devzigma.auth;

import com.devzigma.config.ApplicationProperties;
import com.microsoft.graph.auth.enums.NationalCloud;
import com.microsoft.graph.auth.publicClient.UsernamePasswordProvider;
import com.microsoft.graph.models.extensions.IGraphServiceClient;
import com.microsoft.graph.requests.extensions.GraphServiceClient;

import java.io.IOException;

public class AuthenticationProvider {

    private static AuthenticationProvider authenticationProvider = null;


    public AuthenticationProvider(){ }

    public static AuthenticationProvider getInstance(){
        if (authenticationProvider == null) {
            authenticationProvider = new AuthenticationProvider();
        }
        return authenticationProvider;
    }

    public IGraphServiceClient getAuthProvider() throws IOException {

        UsernamePasswordProvider authProvider = new UsernamePasswordProvider(
                ApplicationProperties.getClientId(),
                ApplicationProperties.getScopeList(),
                ApplicationProperties.getUsername(),
                ApplicationProperties.getPassword(),
                NationalCloud.Global,
                ApplicationProperties.getTenantId(),
                ApplicationProperties.getClientSecret());

        IGraphServiceClient graphClient =
                GraphServiceClient
                        .builder()
                        .authenticationProvider(authProvider)
                        .buildClient();

        return graphClient;
    }
}
You might be wondering what NationtionCloud.Global is ? that listed in the constructor of UsernamePasswordProvider class. Well, let me give you some information from Microsoft’s official documentation.
National clouds are physically isolated instances of Azure. There’s a separate Azure portal for each one of the national clouds. To integrate applications with the Microsoft identity platform in a national cloud, you’re required to register your application separately in each Azure portal that’s specific to the environment.
Microsoft Official Documentation
You can read more information from here about the national cloud.
In the end, our Auth provider should return a graph client, a type of IGraphServiceClient.
Uploading files to SharePoint using graph client
You must be wondering, wow, that’s a lot of work before uploading a file to Sharepoint using Java, right! Trust me; this will be our last step. All right, we have created an auth provider and graph client. Using those objects, let’s call the Graph Java SDK methods.
I’m creating a class UploadingToSharePoint in the com.devzigma.upload package. In that class, I’m going to define all the required methods for uploading files.
If you want to upload large files to SharePoint, this class can handle that as well.
We will be looking into the following things as well.
- Upload to document library of the SharePoint
- Upload to a folder in a document library.
Below is the complete code for the UploadingToSharePoint class.
package com.devzigma.upload;

import com.devzigma.auth.AuthenticationProvider;
import com.microsoft.graph.concurrency.ChunkedUploadProvider;
import com.microsoft.graph.concurrency.IProgressCallback;
import com.microsoft.graph.core.ClientException;
import com.microsoft.graph.models.extensions.*;


import java.io.FileInputStream;
import java.io.FileNotFoundException;
import java.io.IOException;
import java.io.InputStream;

public class UploadToSharePoint {

    private InputStream getInputStream() throws FileNotFoundException {
        // Get an input stream for the file
        InputStream fileStream = new FileInputStream("/data/code/2019/sharepointgraphsdkpoc/src/main/resources/sample.txt");
        return fileStream;
    }

    private void getFileName(InputStream inputStream) throws FileNotFoundException {
        InputStream fileStream = new FileInputStream("/data/code/2019/sharepointgraphsdkpoc/src/main/resources/sample.txt");
    }

    private long getStreamSize(InputStream fileStream) throws IOException {
        long streamSize = (long)fileStream.available();
        return streamSize;
    }

    // Create a callback used by the upload provider
    IProgressCallback<DriveItem> callback = new IProgressCallback<DriveItem>() {
        @Override
        // Called after each slice of the file is uploaded
        public void progress(final long current, final long max) {
            System.out.println(
                    String.format("Uploaded %d bytes of %d total bytes", current, max)
            );
        }

        @Override
        public void success(final DriveItem result) {
            System.out.println(
                    String.format("Uploaded file with ID: %s", result.id)
            );
        }

        public void failure(final ClientException ex) {
            System.out.println(
                    String.format("Error uploading file: %s", ex.getMessage())
            );
        }
    };

    public void setUploadSession() throws IOException {
        final IGraphServiceClient graphClient = new AuthenticationProvider().getAuthProvider();

        // upload to share point
        UploadSession uploadSession1 = graphClient
                .sites()
                .byId("912df12f-2b76-411a-8d38-fd3628fb3ded")
                .drive()
                .root()
                .itemWithPath("sample.txt")
                .createUploadSession(new DriveItemUploadableProperties())
                .buildRequest()
                .post();


        ChunkedUploadProvider<DriveItem> chunkedUploadProvider =
                new ChunkedUploadProvider<DriveItem>
                        (uploadSession1, graphClient, getInputStream(), getStreamSize(getInputStream()), DriveItem.class);

        // Config parameter is an array of integers
        // customConfig[0] indicates the max slice size
        // Max slice size must be a multiple of 320 KiB
        int[] customConfig = { 320 * 1024 };

        // Do the upload
        chunkedUploadProvider.upload(callback, customConfig);
    }

}
In the getInputStream() method , I have provided the file location as /src/main/resources. You can keep your file anywhere and give the correct path to your file.
In the setUploadSession() method, .byId refer to the siteId. SharePoint site is a kind of website with different components like Document Library, Calendar, Task List, etc. Read this article about the site, and you will get more understanding about it.
For your SharePoint account, you can create custom sites as well. When you want to access a specific site, you can use the siteId. I have a site called TeamSite_ForB , That’s where I am going to upload my files.
Read this article on How to get the siteId for a specific site in SharePoint
GraphClient itemWithPath() method examples
graphClient has method called itemWithPath(). It accepts the path of your file to uploads as a String.
For example, We have a file called sample.txt
- I want to upload to root of the document library, then use
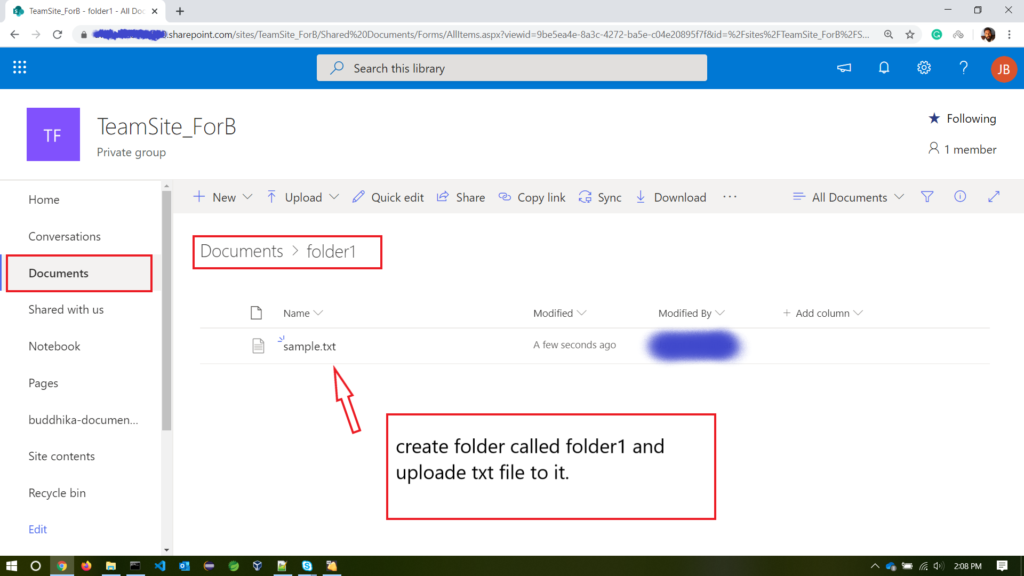
itemWithPath("sample.txt") - I want to upload to a folder in the document library, then use
itemWithPath("folder1/sample.txt")
All right, let’s execute our program. Create a Main class file src/main/java. Inside the main method, create an object of UploadToSharePoint class and invoke the method setUploadSession().
import com.devzigma.upload.UploadToSharePoint;

import java.io.IOException;

public class Main {
    public static void main(String[] args) throws IOException {

        // upload a file to SharePoint site
        UploadToSharePoint uploadToSharePoint = new UploadToSharePoint();
        uploadToSharePoint.setUploadSession();

    }
}
Now go to your SharePoint site document library. You will see your file there.
Conclusion
Congratulations ! you made it. In this tutorial, you learn about SharePoint and how to upload files to SharePoint using Java. You can implement all other features as well, like deleting a file, renaming a file, moving a file, etc. Microsoft provides various programming languages to achieve those. I have chosen Java, but you can select python, Node.js as well. Read this on Microsoft official website. You will get more information from there. Happy coding ?
This is the best guide I have seen for GraphAPI, have you made any other tutorial for accessing the files in the sharepoint.
Hi Gowtham,
Thank you for reading the tutorial.
In the upcoming tutorials, I will add more regarding the SharePoint.