Secure File Transfer Protocol (SFTP) is the secure version of the File Transfer Protocol (FTP). SFTP facilitates data access and data transfer over a Secure Shell (SSH) data stream. It supports the full security and authentication functionality of the SSH protocol, including SSH keys.
The functionality of SFTP is similar to FTP. However, SFTP uses SSH to transfer files to a remote server. SFTP requires that the server must authenticate the client user, and then data transfer takes place over a secure channel (SSH). We will look into how we can SFTP into an Amazon EC2 server with SSH.
While you can use username and passwords to authenticate to a remote server, we can use public key authentication of SSH. It provides a computer-generated, cryptographically generated key that acts as a replacement for a user’s password. These keys are computer-generated, and the key’s length is much longer than a regular password. So the benefit is that we can be secure over a hacker attack. In the later part, we’ll see SFTP with SSH keys into EC2 instance using a Java program.
Table of Contents
Advantages of using SSH key Authentication(private key, public key) over Password Authentication
Let’s look into some of the key benefits of using SSH key authentication over a traditional password logging method.
- High security in the event of hacker attacks
Hackers always find some new ways to break into our systems. Despite our best efforts, valuable data breaches can occur. So if you use a password to communicate with a server and the server has been compromised, then a hacker can steal your password and do some severe damage. Since SSH uses private/public key authentication, a hacker has little to no chance to look into our keys because those keys reside in two different machines.
- Make sure that only approved devices can use to authenticate
The problem with username/password authentication, users can log into servers with different non-secure devices which makes it easy for hackers to steal your credentials. So the benefit of using ssh keys such that only verified devices can store the private ssh key. Then using that device, users will be able to log in. That makes it more secure.
- SSH keys are Computer generated
Typical human behaviour is to create very easy to guess passwords. That makes it far more vulnerable. Since ssh keys are Computer generated, it’s tough to guess.
All right, now let’s move into the most exciting part. For demonstrating SSH key authentication with SFTP, I will create an AWS EC2 machine. Then I’ll SFTP into EC2 machine from my local Linux machine.
Note: For both client and server, I’ll be using Linux machines. My client will be centos 7, and the server will be Amazon Linux 2 AMI machine.
Create Amazon EC2 instance
As I mentioned in the earlier section, we need a server for which we’re going to SFTP into. For that purpose let’s create an EC2 instance in AWS.
- Log into your AWS management console. Find EC2 service in the AWS services.
- Select the launch instance then you’ll redirect to a series of steps to create a new Amazon EC2 instance.
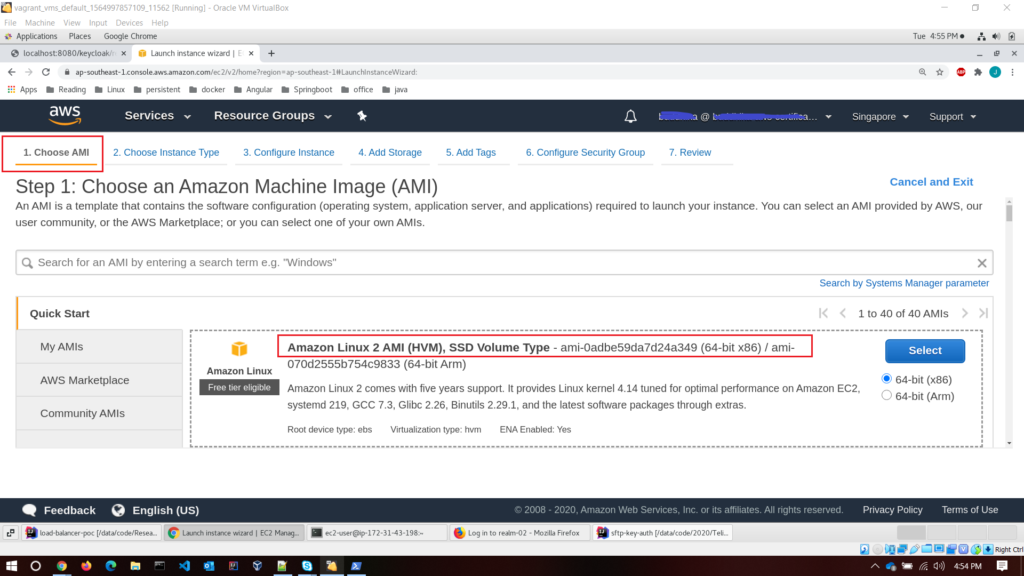
- Step 1 – Choose an Amazon Machine Image (AMI); I’ll choose Amazon Linux 2 AMI because it’s free tier eligible. Meaning; it doesn’t cost us a penny. Select it.
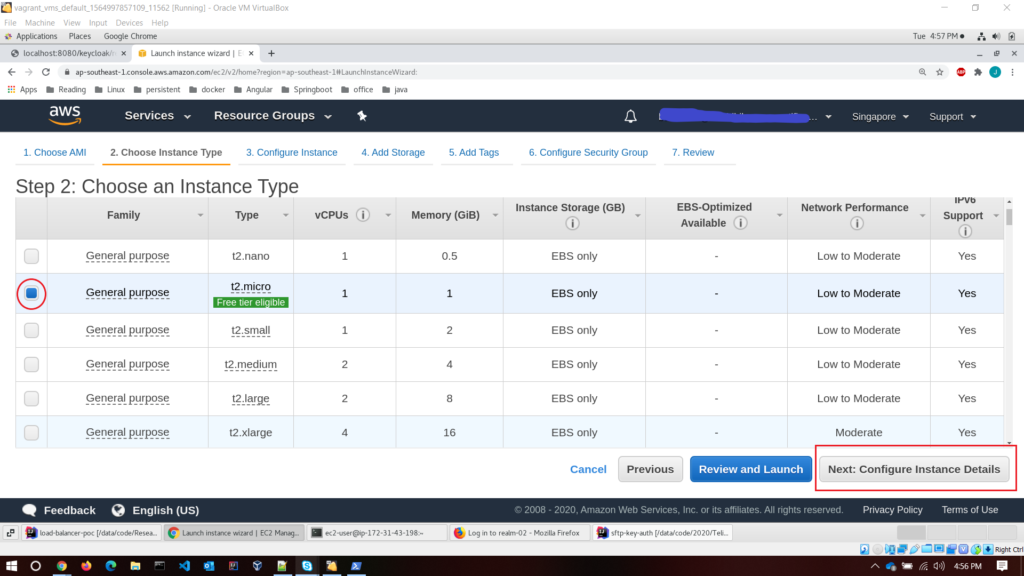
- Step 2 – Choose an Instance Type;
T2.microis the only available instance type within the free tier. So choose that.
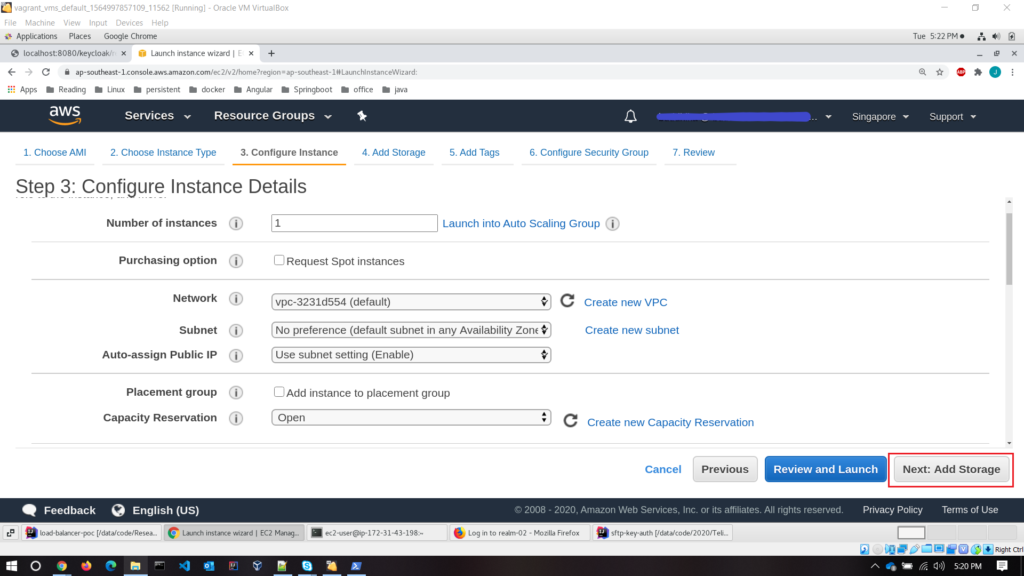
- Step 3 – configure the instance details; set the default details as it is. I won’t change anything. If you want you can play around with it.
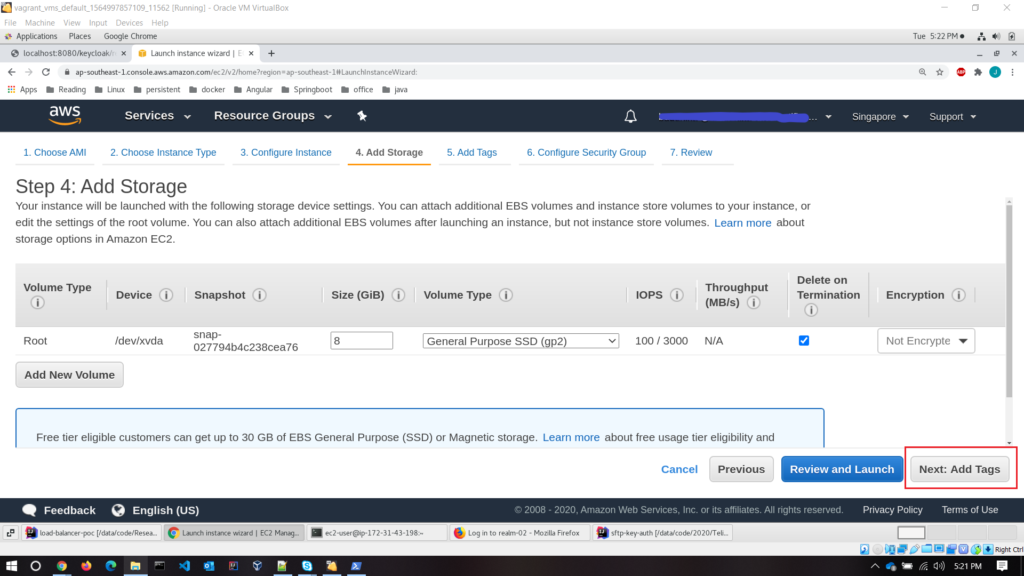
- Step 4 – add storage; Set the default setting as it is. Make sure that volume type is
Rootandsizeat least 8GiB.
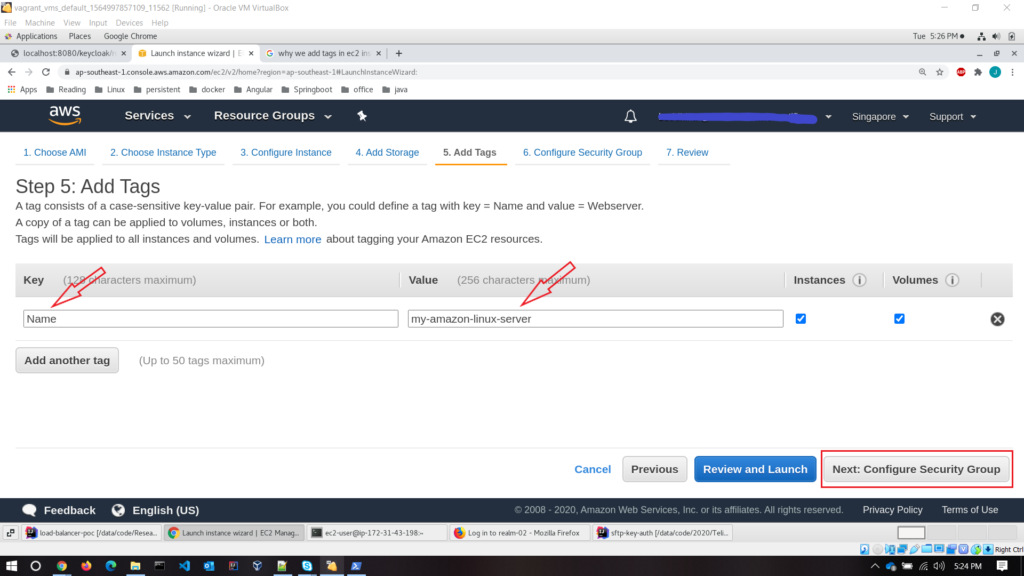
- Step 5 – add tags; Tags enable us to categorize our AWS resources in different ways. For example, I have defined a tag key called
Nameand provide the value asmy-amazon-linux-server. You can define your own tags as well.
- Step 6 – configure the security group
What is security group ?
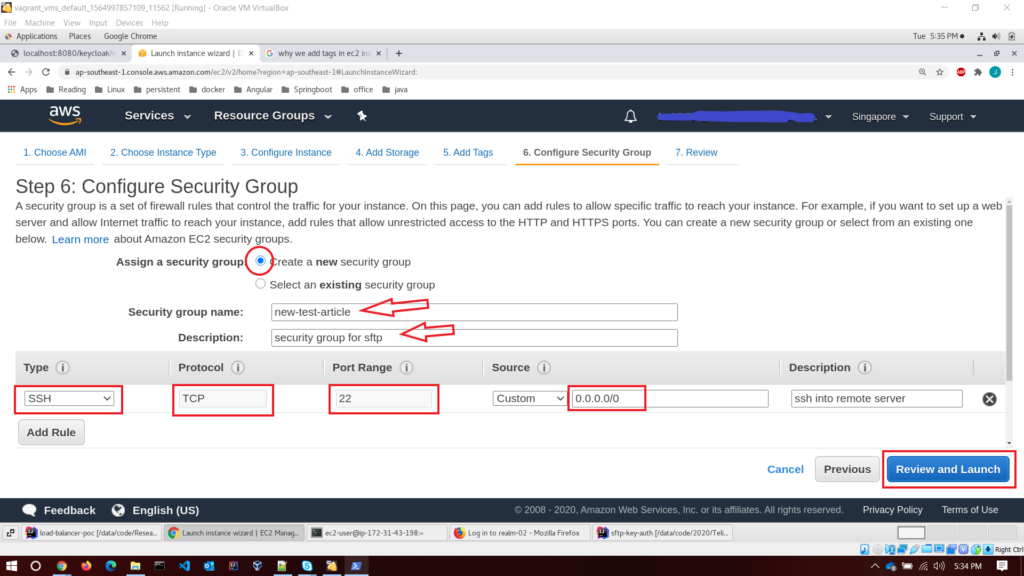
A security group is a set of firewall rules. It controls the traffic for our instance. We have two options; either create a new one or use an existing one. So let’s create a new security group. I have added a new security group name and description. Just one rule we are interested in here. That is the SSH rule.
Provide below values to the rule
- Type – SSH
- Protocol – TCP
- Port range – 22
- Source – custom (0.0.0.0/0)
- Description – simple description here to define your rule
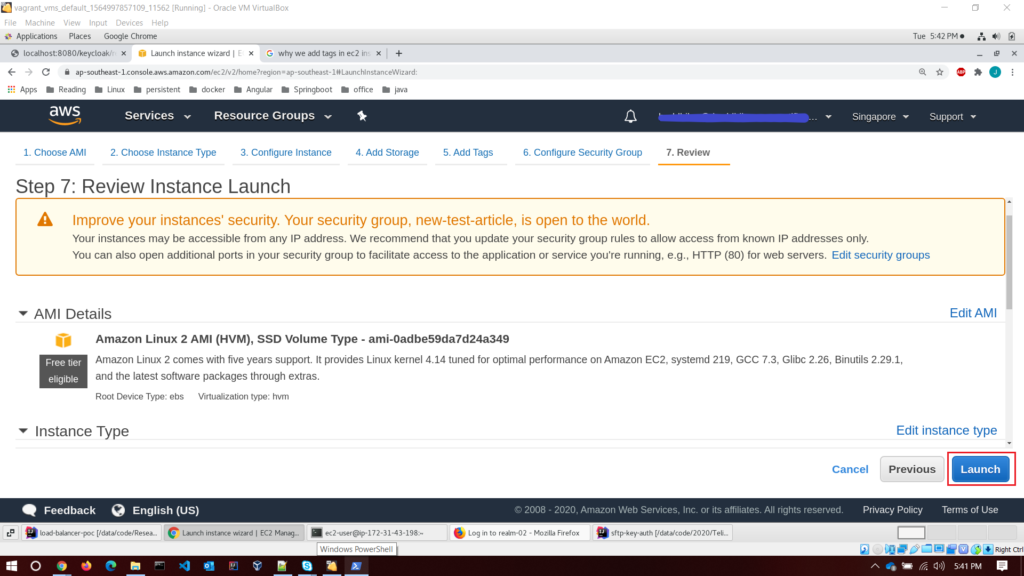
- Step 7 – review instance launch; Before creating the instance, you can review your configuration. Then hit the launch button.
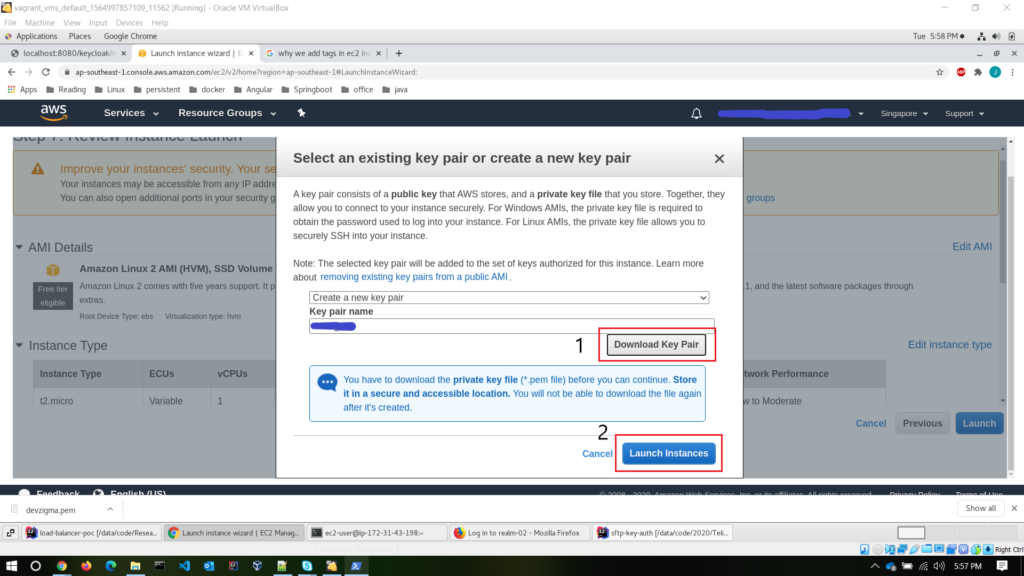
Now comes the important part. For communicating with the created instance, we need a secure mechanism. For that, we need a key pair. AWS will generate that key for us. Let’s create a new key pair with a suitable name and then download it to your computer. AWS will give us the private key file, and the public key file will keep on the AWS side.
- Download the key pair
- Launch the instance
All right, now our remote server setup is completed. Read this AWS guide on detailed explanations of each step.
Configure pem file for “SSH into EC2”
In the previous steps, you have downloaded the AWS generated pem file. Now we are going to make some changes to that file. As my client machine, I’m going to use Centos version 7. Nothing is stopping you choosing other Linux distributions or Mac.
- Copy the downloaded file to
.sshdirectory. If not create a.sshdirectory inside your user account’shomedirectory.
cp devzigma.pem /home/centos/.ssh- Change the permission of
pemfile to read access only.
chmod 400 devzigma.pem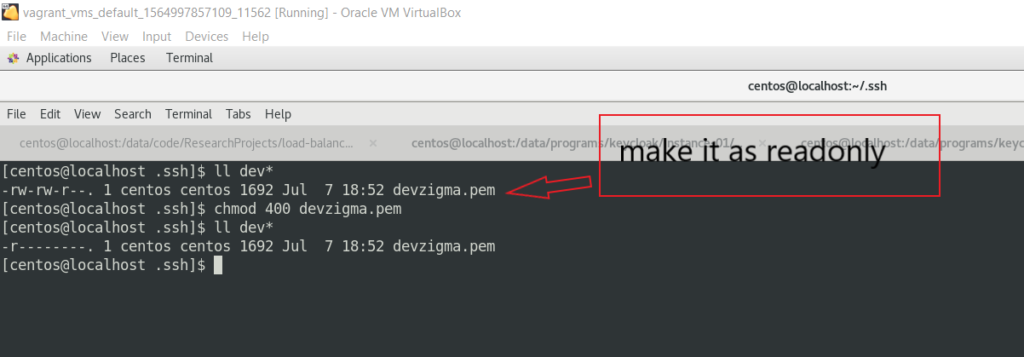
SFTP with Remote Server / EC2 instance with SSH using Java
Although there are tools available for SFTP with SSH keys into EC2 instance, I will demonstrate how to do that in a programmatic approach using Java in this tutorial. JSch, SSHJ, and Apache commons VFS are some of the most popular SFTP libraries you can use for your projects.
I choose the JSch library for going forward.
Project structure
There are some prerequisites you’ll need
- Java 8 or higher
- Any remote server (in our case Amazon EC2 instance)
- SSH should enable in your Operating system.
Below is the project structure for our Java program.
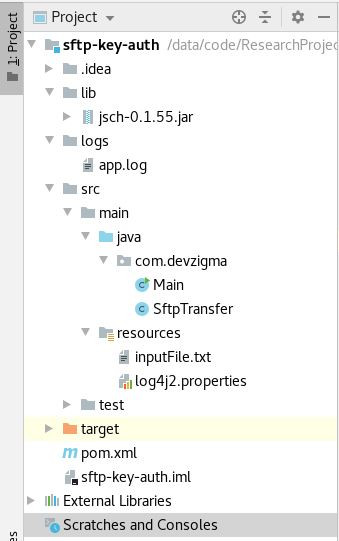
Maven configuration
We need to add JSch dependency to our pom.xml file. The latest version of JSch can download from maven central.
Below is the complete pom.xml file.
<?xml version="1.0" encoding="UTF-8"?>
<project xmlns="http://maven.apache.org/POM/4.0.0"
         xmlns:xsi="http://www.w3.org/2001/XMLSchema-instance"
         xsi:schemaLocation="http://maven.apache.org/POM/4.0.0 http://maven.apache.org/xsd/maven-4.0.0.xsd">
    <modelVersion>4.0.0</modelVersion>

    <groupId>com.devzigma</groupId>
    <artifactId>sftp-key-auth</artifactId>
    <version>1.0-SNAPSHOT</version>

    <properties>
        <maven.compiler.source>14</maven.compiler.source>
        <maven.compiler.target>14</maven.compiler.target>
    </properties>

    <dependencies>

        <dependency>
            <groupId>com.jsch</groupId>
            <artifactId>jsch</artifactId>
            <version>0.1.55</version>
            <scope>system</scope>
            <systemPath>/data/code/ResearchProjects/sftp-key-auth/lib/jsch-0.1.55.jar</systemPath>
        </dependency>

        <dependency>
            <groupId>org.apache.logging.log4j</groupId>
            <artifactId>log4j-api</artifactId>
            <version>2.12.1</version>
        </dependency>

        <dependency>
            <groupId>org.apache.logging.log4j</groupId>
            <artifactId>log4j-core</artifactId>
            <version>2.12.1</version>
        </dependency>

    </dependencies>

</project>
I have downloaded the JSch jar file and put it into the lib folder, provided the path for that in the pom.xml file as a dependency. However, You can put dependency directly in your pom.xml file. It’s your preference.
Transfer file from client to server with use of SSH keys
I have created a class SftpTranfer.java. All the SFTP related code goes there.
package com.devzigma;

import com.jcraft.jsch.*;
import org.apache.logging.log4j.LogManager;
import org.apache.logging.log4j.Logger;

public class SftpTransfer {
    private static final Logger logger = LogManager.getLogger(SftpTransfer.class);

    public void transferLocalFileToRemoteHost(String filenameWithPath) {
        JSch jsch = new JSch();
        Session session = null;
        try {
            /*
            * getSession() method required 3 parameters.
            * username of the remote server
            * IP address of the remote server
            * SSH port of the remote server
            */
            session = jsch.getSession("ec2-user", "13.212.11.68", 22);
            logger.info("session created.");

            String privateKey = "/home/centos/.ssh/devzigma.pem";
            jsch.addIdentity(privateKey);
            logger.info("identity added");

            session.setConfig("StrictHostKeyChecking", "no");
            logger.info("Trying to connect...");
            session.connect();
            logger.info("Connected successfully.");


            Channel channel = session.openChannel("sftp");
            channel.connect();
            ChannelSftp sftpChannel = (ChannelSftp) channel;
            logger.info("Doing SFTP...");
            /*
            * put method takes two arguments.
            * first one is the file which located in our local machine
            * second one is the place our file should be transfer.
            */
            sftpChannel.put(filenameWithPath, "/home/ec2-user");
            logger.info("Success");
            sftpChannel.exit();
            session.disconnect();

        } catch (SftpException | JSchException e) {
            logger.trace("Error occured during SFTP " + e.getMessage());
        }
    }
}
In the SftpTransfer class, we’ve only one method. Its pure purpose is to transfer the local inputFile.txt file to the EC2 server home directory.
Now let’s run our application. For that, I have created a Main.java class and created an object of SftpTranfer. Then invoked the method of transferLocalFileToRemoteHost().
package com.devzigma;

public class Main {
    public static void main(String[] args) {
        SftpTransfer sftpTransfer = new SftpTransfer();
        sftpTransfer.transferLocalFileToRemoteHost("/data/code/ResearchProjects/sftp-key-auth/src/main/resources/inputFile.txt");
    }
}
Let’s run our application. If it’s successful, all the log messages will log in to the console.
[INFO ] 2020-07-11 00:31:41.040 [main] SftpTransfer - session created.
[INFO ] 2020-07-11 00:31:41.053 [main] SftpTransfer - identity added
[INFO ] 2020-07-11 00:31:41.054 [main] SftpTransfer - Trying to connect...
[INFO ] 2020-07-11 00:31:42.429 [main] SftpTransfer - Connected successfully.
[INFO ] 2020-07-11 00:31:43.487 [main] SftpTransfer - Doing SFTP...
[INFO ] 2020-07-11 00:31:43.816 [main] SftpTransfer - Success

Process finished with exit code 0
As you can see, our application ran without any errors. That means SFTP with SSH keys using Java into EC2 instance was successful.
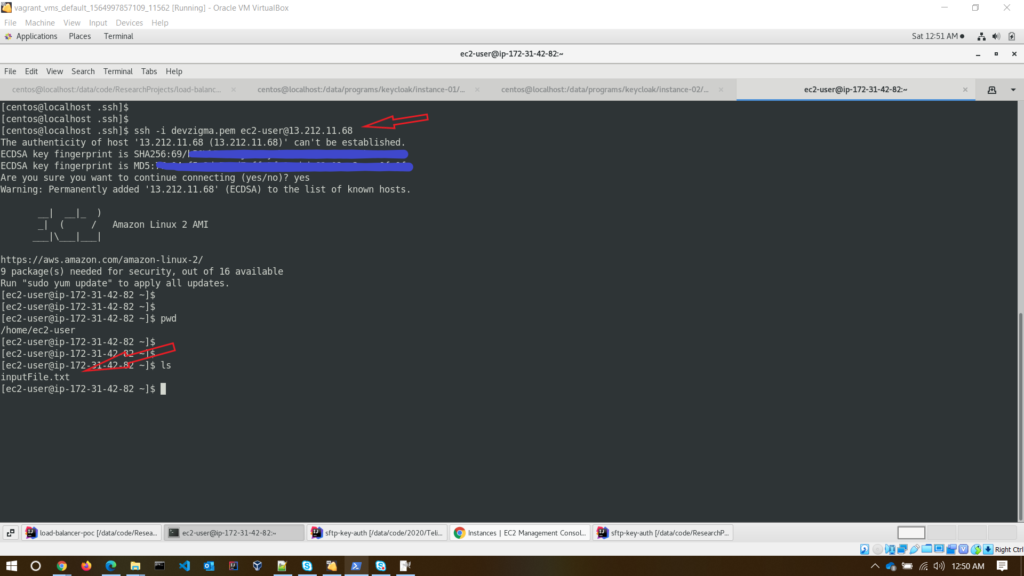
Let’s SSH into the EC2 instance and check whether the file has been uploaded. For that, go to the home directory or EC2 instance. Use below command to SSH into the EC2 instance.
ssh -i devzigma.pem [email protected]After login to the EC2 instance, you can see the inputFile.txt file in the home directory.
Conclusion
In this tutorial, you have learned about securely transferring files to a remote server using SSH. It’s more secure than the username/password approach. You can secure more, adding a password for the private key file as well. In the upcoming tutorials, I will share that method as well. Until then, Happy coding !!!
