When it comes to working with HTTP (hypertext transfer protocol), we have to understand web servers and web clients. So basically, a web server can be referred to as hardware or software, which can be both working together. Web browsers are examples of web clients. In this tutorial let’s see how to use Java gzip compression over HTTP data to transfer between server and web clients.
Let me put into how these works. Whenever a browser or web client needs a file or data hosted on a web server, the browser requests the file via HTTP. Those files could be images, songs, pdf, documents, or data such as JSON or XML.
When the request hits the webserver, it finds the requested document or file then sends it back to the browser via the same HTTP. If the webserver doesn’t find, then a 404 response is returned.

A web server could be static or dynamic.
- Static webserver – server sends hosted files or data as it is to the web client.
- Dynamic webserver – most commonly composed of an application server with a database. Application servers interact with the databases on data or files before sending them to the web browser.
So the need for compression arises with this. Imagine you have a large amount of data needed to transfer over this HTTP. Your web client requests data from the server. So what if that data is massive. It will require a significant amount of bandwidth as well as transfer time.
We will look into how to compress data from the server-side and send them to the client-side. I will demonstrate using a spring boot application.
Table of Contents
What is HTTP compression?
Http compression is a capability that can be built into web servers and web clients to improve the transfer of data and bandwidth utilization. Data is compressed from the server-side before it sends it to the web client. If the web client complies with the compression schemas, it will uncompress the data received from the server.
The above concept, we called “compression schema negotiation.”
There are two most common compression schemes we use.
- gzip
- deflate
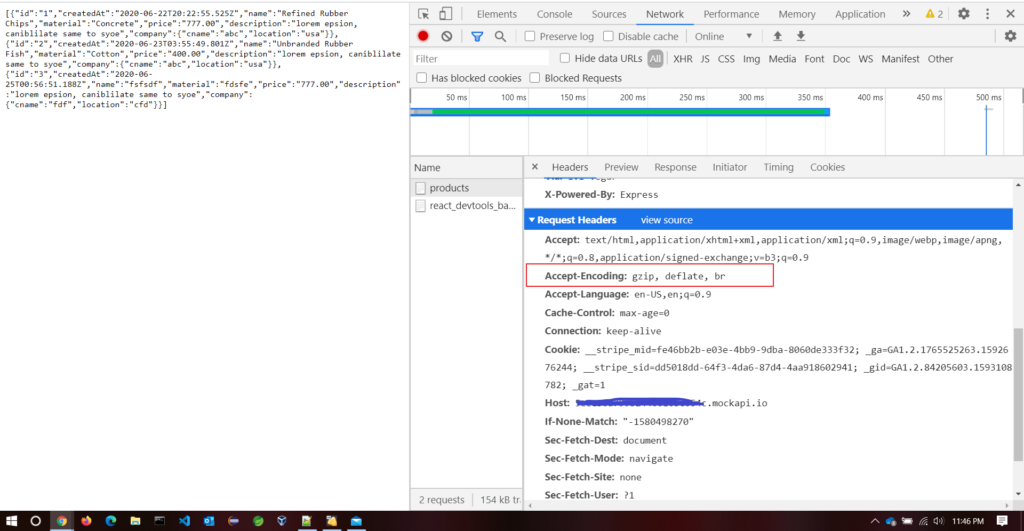
HTTP clients or web clients indicate their support for compression using Accept-Encoding in the request header.
The below image shows the accept-encoding property in the request header when calling an API endpoint.
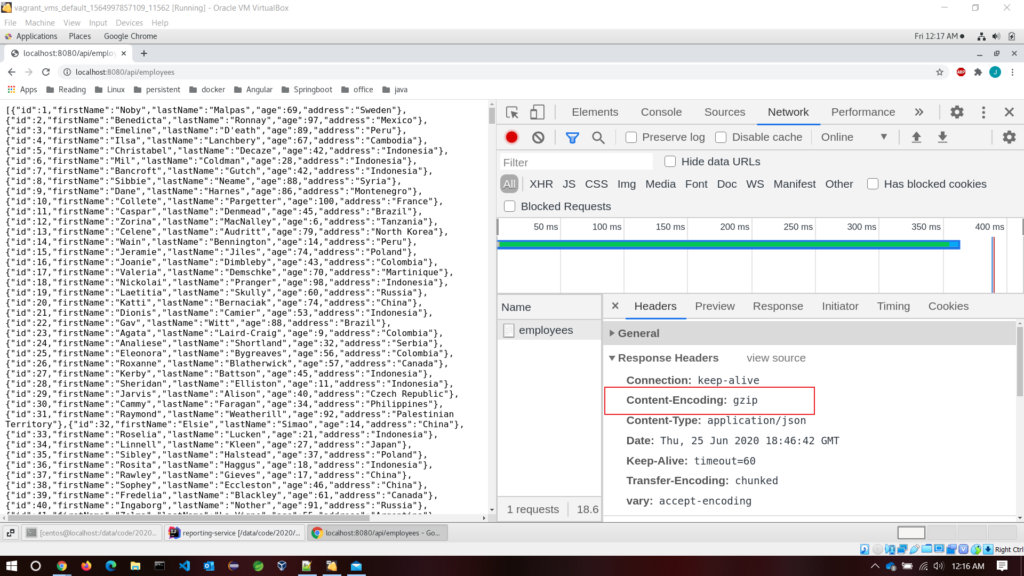
A web server will only compress content for clients that support compression. Then the server will set the property in the response header so that client knows which compression algorithm to use when reading the response body.
The below image shows the content-encoding property in the response header after calling an API endpoint.
Java gzip compression over HTTP data
All right, now you have a good understanding of HTTP compression, let’s dive into the implementation part. In this section, I will create a sample spring boot application and show you guys how to enable gzip and data transfer over HTTP with Java Gzip compression.
prerequisites
- Java 8 or higher
- Maven 3.6.0 or higher
- Intellij idea or eclipse IDE
Creating a Gzip compression enable Java Spring boot application
First of all, let’s create a spring boot application. You have a few options to create such an application. Throughout this tutorial, I’ll use the IntelliJ idea as my code editor. You can use the IntelliJ idea to create a spring boot application. If not, go to the spring initializer web site, and you can create a boilerplate application. After creating that application, you can import it to your IDE.
When you are creating the application, choose below dependencies.
- Spring-boot-starter-web
- Spring-boot-starter-data-JPA
- H2 ( for persistence we use h2 in-memory database)
Spring starter web
When developing REST services, we usually use Spring MVC, Tomcat, and Jackson. Spring boot starter web contains all those dependencies so that we don’t need to manage all those dependencies manually.
Spring starter Data JPA
Most web applications have some persistence and Java Persistent API is the go-to approach for that. Spring Data JPA adds a layer on top of JPA and uses all features available in JPA specification. It handles most of the complexity of JDBC based database access and ORM (Object Relational Mapping).
H2 database
H2 is an in-memory database which usually uses for unit testing, and proof of concepts (POC) works. Because it is an in-memory database data won’t persist when the application terminated. Spring boot provides excellent integration with the H2 database.
Project structure for Java gzip compression example
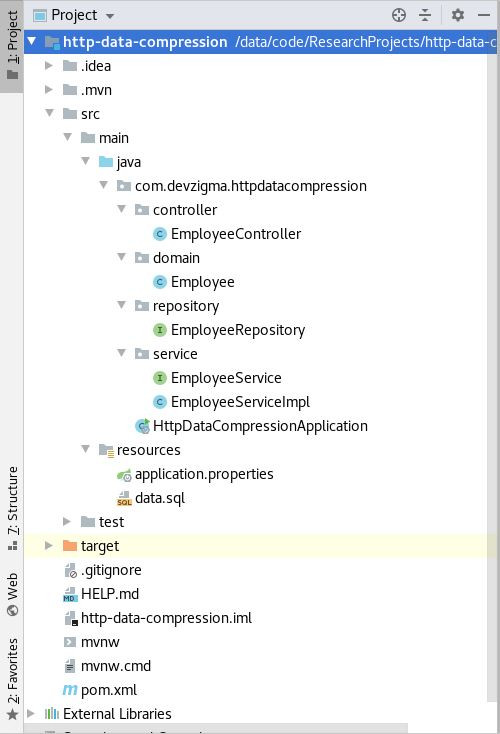
Below is the project structure of our codebase.
Implementation for Java gzip compression over HTTP data
As I mentioned earlier, you need those dependencies to go forward. When generating a spring boot application, starter test dependency will automatically add to the pom.xml file.
Now, here is our application’s pom.xml file.
<?xml version="1.0" encoding="UTF-8"?>
<project xmlns="http://maven.apache.org/POM/4.0.0" xmlns:xsi="http://www.w3.org/2001/XMLSchema-instance"
         xsi:schemaLocation="http://maven.apache.org/POM/4.0.0 https://maven.apache.org/xsd/maven-4.0.0.xsd">
    <modelVersion>4.0.0</modelVersion>
    <parent>
        <groupId>org.springframework.boot</groupId>
        <artifactId>spring-boot-starter-parent</artifactId>
        <version>2.3.1.RELEASE</version>
        <relativePath/> <!-- lookup parent from repository -->
    </parent>
    <groupId>com.devzigma</groupId>
    <artifactId>http-data-compression</artifactId>
    <version>0.0.1-SNAPSHOT</version>
    <name>http-data-compression</name>
    <description>Demo project for Spring Boot</description>

    <properties>
        <java.version>14</java.version>
    </properties>
    <dependencies>
        <dependency>
            <groupId>org.springframework.boot</groupId>
            <artifactId>spring-boot-starter-data-jpa</artifactId>
        </dependency>
        <dependency>
            <groupId>org.springframework.boot</groupId>
            <artifactId>spring-boot-starter-web</artifactId>
        </dependency>
        <dependency>
            <groupId>com.h2database</groupId>
            <artifactId>h2</artifactId>
            <scope>runtime</scope>
        </dependency>
        <dependency>
            <groupId>org.springframework.boot</groupId>
            <artifactId>spring-boot-starter-test</artifactId>
            <scope>test</scope>
            <exclusions>
                <exclusion>
                    <groupId>org.junit.vintage</groupId>
                    <artifactId>junit-vintage-engine</artifactId>
                </exclusion>
            </exclusions>
        </dependency>
    </dependencies>

    <build>
        <plugins>
            <plugin>
                <groupId>org.springframework.boot</groupId>
                <artifactId>spring-boot-maven-plugin</artifactId>
            </plugin>
        </plugins>
    </build>

</project>
Our application’s main package is com.devzigma. Under that, create a domain, repository, service, and controller layers to manage our code efficiently. In the domain package, I have created an Employee class. All the persistence related logic goes to the repository package, and the business logic goes to the service package. All the client requests will go to the controller class.
Domain model
Here is the employee entity (domain) class. Someone who doesn’t know why we define entity or domain class; because those domain instances often needed to be saved in the database. In the Java context, we called it confirms to the JavaBeans specification. I.e., they have getters, setters, and a parameterless constructor.
package com.devzigma.httpdatacompression.domain;

import javax.persistence.Entity;
import javax.persistence.Id;

@Entity
public class Employee {

    @Id
    private int id;
    private String firstName;
    private String lastName;
    private int age;
    private String address;

    public Employee() {
    }

    public Employee(int id, String firstName, String lastName, int age, String address) {
        this.id = id;
        this.firstName = firstName;
        this.lastName = lastName;
        this.age = age;
        this.address = address;
    }

    public int getId() {
        return id;
    }

    public void setId(int id) {
        this.id = id;
    }

    public String getFirstName() {
        return firstName;
    }

    public void setFirstName(String firstName) {
        this.firstName = firstName;
    }

    public String getLastName() {
        return lastName;
    }

    public void setLastName(String lastName) {
        this.lastName = lastName;
    }

    public int getAge() {
        return age;
    }

    public void setAge(int age) {
        this.age = age;
    }

    public String getAddress() {
        return address;
    }

    public void setAddress(String address) {
        this.address = address;
    }

    @Override
    public String toString() {
        return "Employee{" +
                "id=" + id +
                ", firstName='" + firstName + '\'' +
                ", lastName='" + lastName + '\'' +
                ", age=" + age +
                ", address='" + address + '\'' +
                '}';
    }
}
Repository Layer
As a practice, any access to the database should go to the repository layer. The database can be any storage. Our repository layer should only focus on database operations. Such as create, delete, update, and read.
package com.devzigma.httpdatacompression.repository;

import com.devzigma.httpdatacompression.domain.Employee;
import org.springframework.data.jpa.repository.JpaRepository;
import org.springframework.stereotype.Repository;

@Repository
public interface EmployeeRepository extends JpaRepository<Employee, Integer> {}
We created the interface of EmployeeRepository then extended it to JpaRepository<T, Id> so that we can get a bunch of generic CRUD methods to interact with the database.
Service Layer
The service layer is not specific to spring boot. Most of the other software applications creating using different programming languages has this software term. The service layer has some responsibilities, such as encapsulating business logic, centralizing the data access to the database, and defining boundaries of transaction beginning and end.
Here I have created an interface of EmployeeService. Then the actual business logic defined in the implementation class, which implements the above interface.
package com.devzigma.httpdatacompression.service;

import com.devzigma.httpdatacompression.domain.Employee;

import java.util.List;

public interface EmployeeService {

    public List<Employee> retrieveEmployees();
}
EmployeeServiceImpl class will implements the above interface.
package com.devzigma.httpdatacompression.service;

import com.devzigma.httpdatacompression.domain.Employee;
import com.devzigma.httpdatacompression.repository.EmployeeRepository;
import org.springframework.beans.factory.annotation.Autowired;
import org.springframework.stereotype.Service;

import java.util.List;

@Service
public class EmployeeServiceImpl implements EmployeeService {

    private final EmployeeRepository employeeRepository;

    @Autowired
    public EmployeeServiceImpl(EmployeeRepository employeeRepository) {
        this.employeeRepository = employeeRepository;
    }

    @Override
    public List<Employee> retrieveEmployees() {
        return employeeRepository.findAll();
    }
}
As you can see, not much of code here. Just a method for retrieving employees from the database. I have kept it simple for the sake of this tutorial.
Controller Layer
Finally, for accessing our application with HTTP, we create a rest controller class. @RestController is a convenient way of creating RESTful controllers. It is a specialization of @Component and auto-detected through the classpath scanning.
package com.devzigma.httpdatacompression.controller;

import com.devzigma.httpdatacompression.domain.Employee;
import com.devzigma.httpdatacompression.repository.EmployeeRepository;
import org.springframework.beans.factory.annotation.Autowired;
import org.springframework.web.bind.annotation.GetMapping;
import org.springframework.web.bind.annotation.RestController;

import java.util.List;

@RestController
public class EmployeeController {

    private final EmployeeRepository employeeRepository;

    @Autowired
    public EmployeeController(EmployeeRepository employeeRepository) {
        this.employeeRepository = employeeRepository;
    }

    @GetMapping("/api/employees")
    public List<Employee> getAllEmployee() {
        return employeeRepository.findAll();
    }
}
Data population in the database Java gzip compression over HTTP data
I have created an employee table and inserted 1000 records to that table. So that I can demonstrate HTTP compression in real action, all that SQL commands put into a file called data.sql. So that each time our application runs, in the runtime our h2 database will populate with employee records.
DROP TABLE IF EXISTS employee;

CREATE TABLE employee (
  id INT AUTO_INCREMENT  PRIMARY KEY,
  first_name VARCHAR(250) NOT NULL,
  last_name VARCHAR(250) NOT NULL,
  age int NOT NULL,
  address varchar(250) NOT NULL
);


insert into employee (first_name, last_name, age, address) values ('Noby', 'Malpas', 69, 'Sweden');
insert into employee (first_name, last_name, age, address) values ('Benedicta', 'Ronnay', 97, 'Mexico');
insert into employee (first_name, last_name, age, address) values ('Emeline', 'D''eath', 89, 'Peru');
insert into employee (first_name, last_name, age, address) values ('Ilsa', 'Lanchbery', 67, 'Cambodia');
insert into employee (first_name, last_name, age, address) values ('Christabel', 'Decaze', 42, 'Indonesia');
In the above SQL script, I have added only five insert records for brevity. Make sure to add 1000 records when you develop the application.
Database configuration
All the h2 database configurations have located in the application.properties file.
spring.datasource.url=jdbc:h2:mem:testdb
spring.h2.console.enabled=true
spring.h2.console.path=/h2-console
spring.datasource.driverClassName=org.h2.Driver
spring.datasource.username=sa
spring.datasource.password=
spring.jpa.database-platform=org.hibernate.dialect.H2Dialect
spring.jpa.show-sql=true
All right, let’s run our spring boot application.
Run the application without HTTP compression
First of all, let’s run our application without HTTP compression. So the flow is when we hit the /api/employees endpoint; we get a JSON response of 1000 employees.
Use this maven command to run the application on the terminal.
mvn spring-boot:runLet’s go to our network tab in the chrome developers tool. In there, you can see all the requests made by our application.
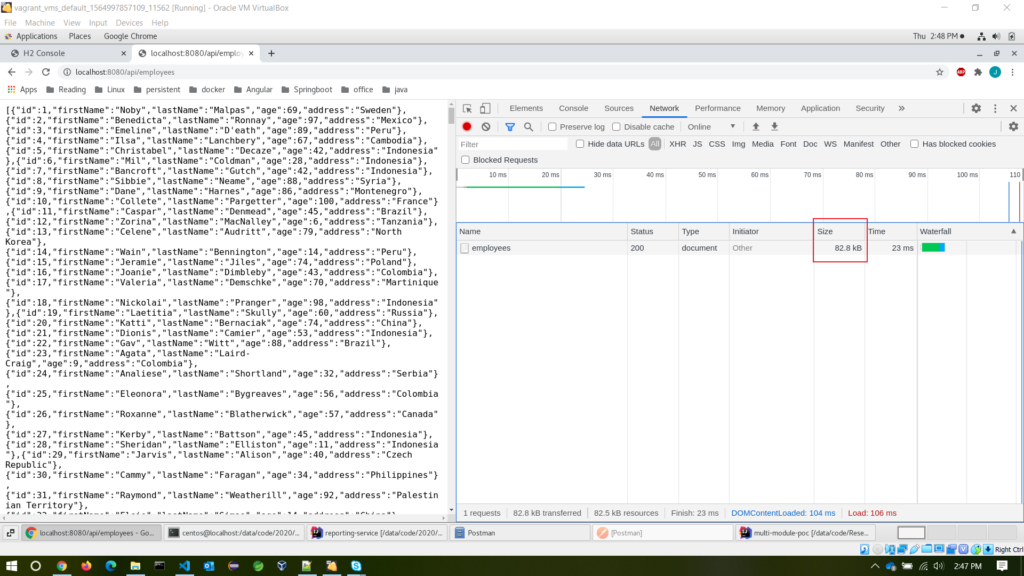
In the size column, we can see that the transferred data’s size is 82.8 KB, which means 82.8 KB of employee resource transfer over the network. If it is a small size resource, then there won’t be much problem. Assume we have a significant amount of data resources that we want to transfer over the network through HTTP. Then HTTP compression comes to the rescue.
Run the application with HTTP Compression
By default, data compression is not enabled in the Apache tomcat server. One benefit of using spring boot is that those applications have embedded a tomcat server out of the box. So much easier to configure. To enable HTTP compression in the application.properties file add below properties.
# Enable response compression
server.compression.enabled=true

# The comma-separated list of mime types that should be compressed
server.compression.mime-types=text/html,text/xml,text/plain,text/css,text/javascript,application/javascript,application/json

# Compress the response only if the response size is at least 1KB
server.compression.min-response-size=1024
Now HTTP compression is enabled. After enabling, here is the full application.properties file.
spring.datasource.url=jdbc:h2:mem:testdb
spring.h2.console.enabled=true
spring.h2.console.path=/h2-console
spring.datasource.driverClassName=org.h2.Driver
spring.datasource.username=sa
spring.datasource.password=
spring.jpa.database-platform=org.hibernate.dialect.H2Dialect
spring.jpa.show-sql=true

# Enable response compression
server.compression.enabled=true

# The comma-separated list of mime types that should be compressed
server.compression.mime-types=text/html,text/xml,text/plain,text/css,text/javascript,application/javascript,application/json

# Compress the response only if the response size is at least 1KB
server.compression.min-response-size=1024
Now let’s run the application one more time. This time call the same endpoint as before. That’s http://localhost:8080/api/employees.
Now go to the chrome developer console. In the network tab, select the resource of employees. After selecting that, you will see the size of the transfer data now reduced to 18.6 KB. So it’s a considerable improvement in transferring data with HTTP.
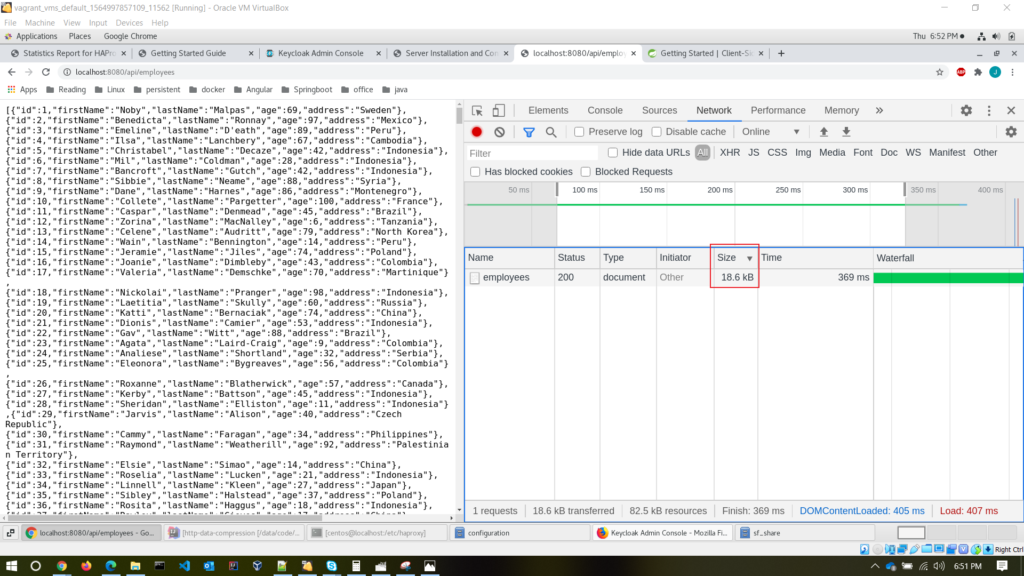
Let’s summarize the compression ratio, space-saving, and transfer size with and without gzip compression.
| Without gzip compression | With gzip compression | |
| Transfer size | 82.8KB | 18.6KB |
| Compression ratio | N/A | 4 : 1 |
| Space saving | N/A | 77.6 % |
Conclusion
All right, in this tutorial, you’ve learned about data transfer over HTTP with Java gzip compression, its benefits, where we can use it, etc. When you have a lot of data to be transferred over HTTP, thinking about data compression is a good use case. You can find the complete code from our GitHub page. Click here. Until then, happy coding.
